ONNX to QNN for Linux Host
This guide will teach you how to convert your ONNX model into an executable that can be run on a target device’s processors using Qualcomm AI Engine Direct (aka the QNN SDK).
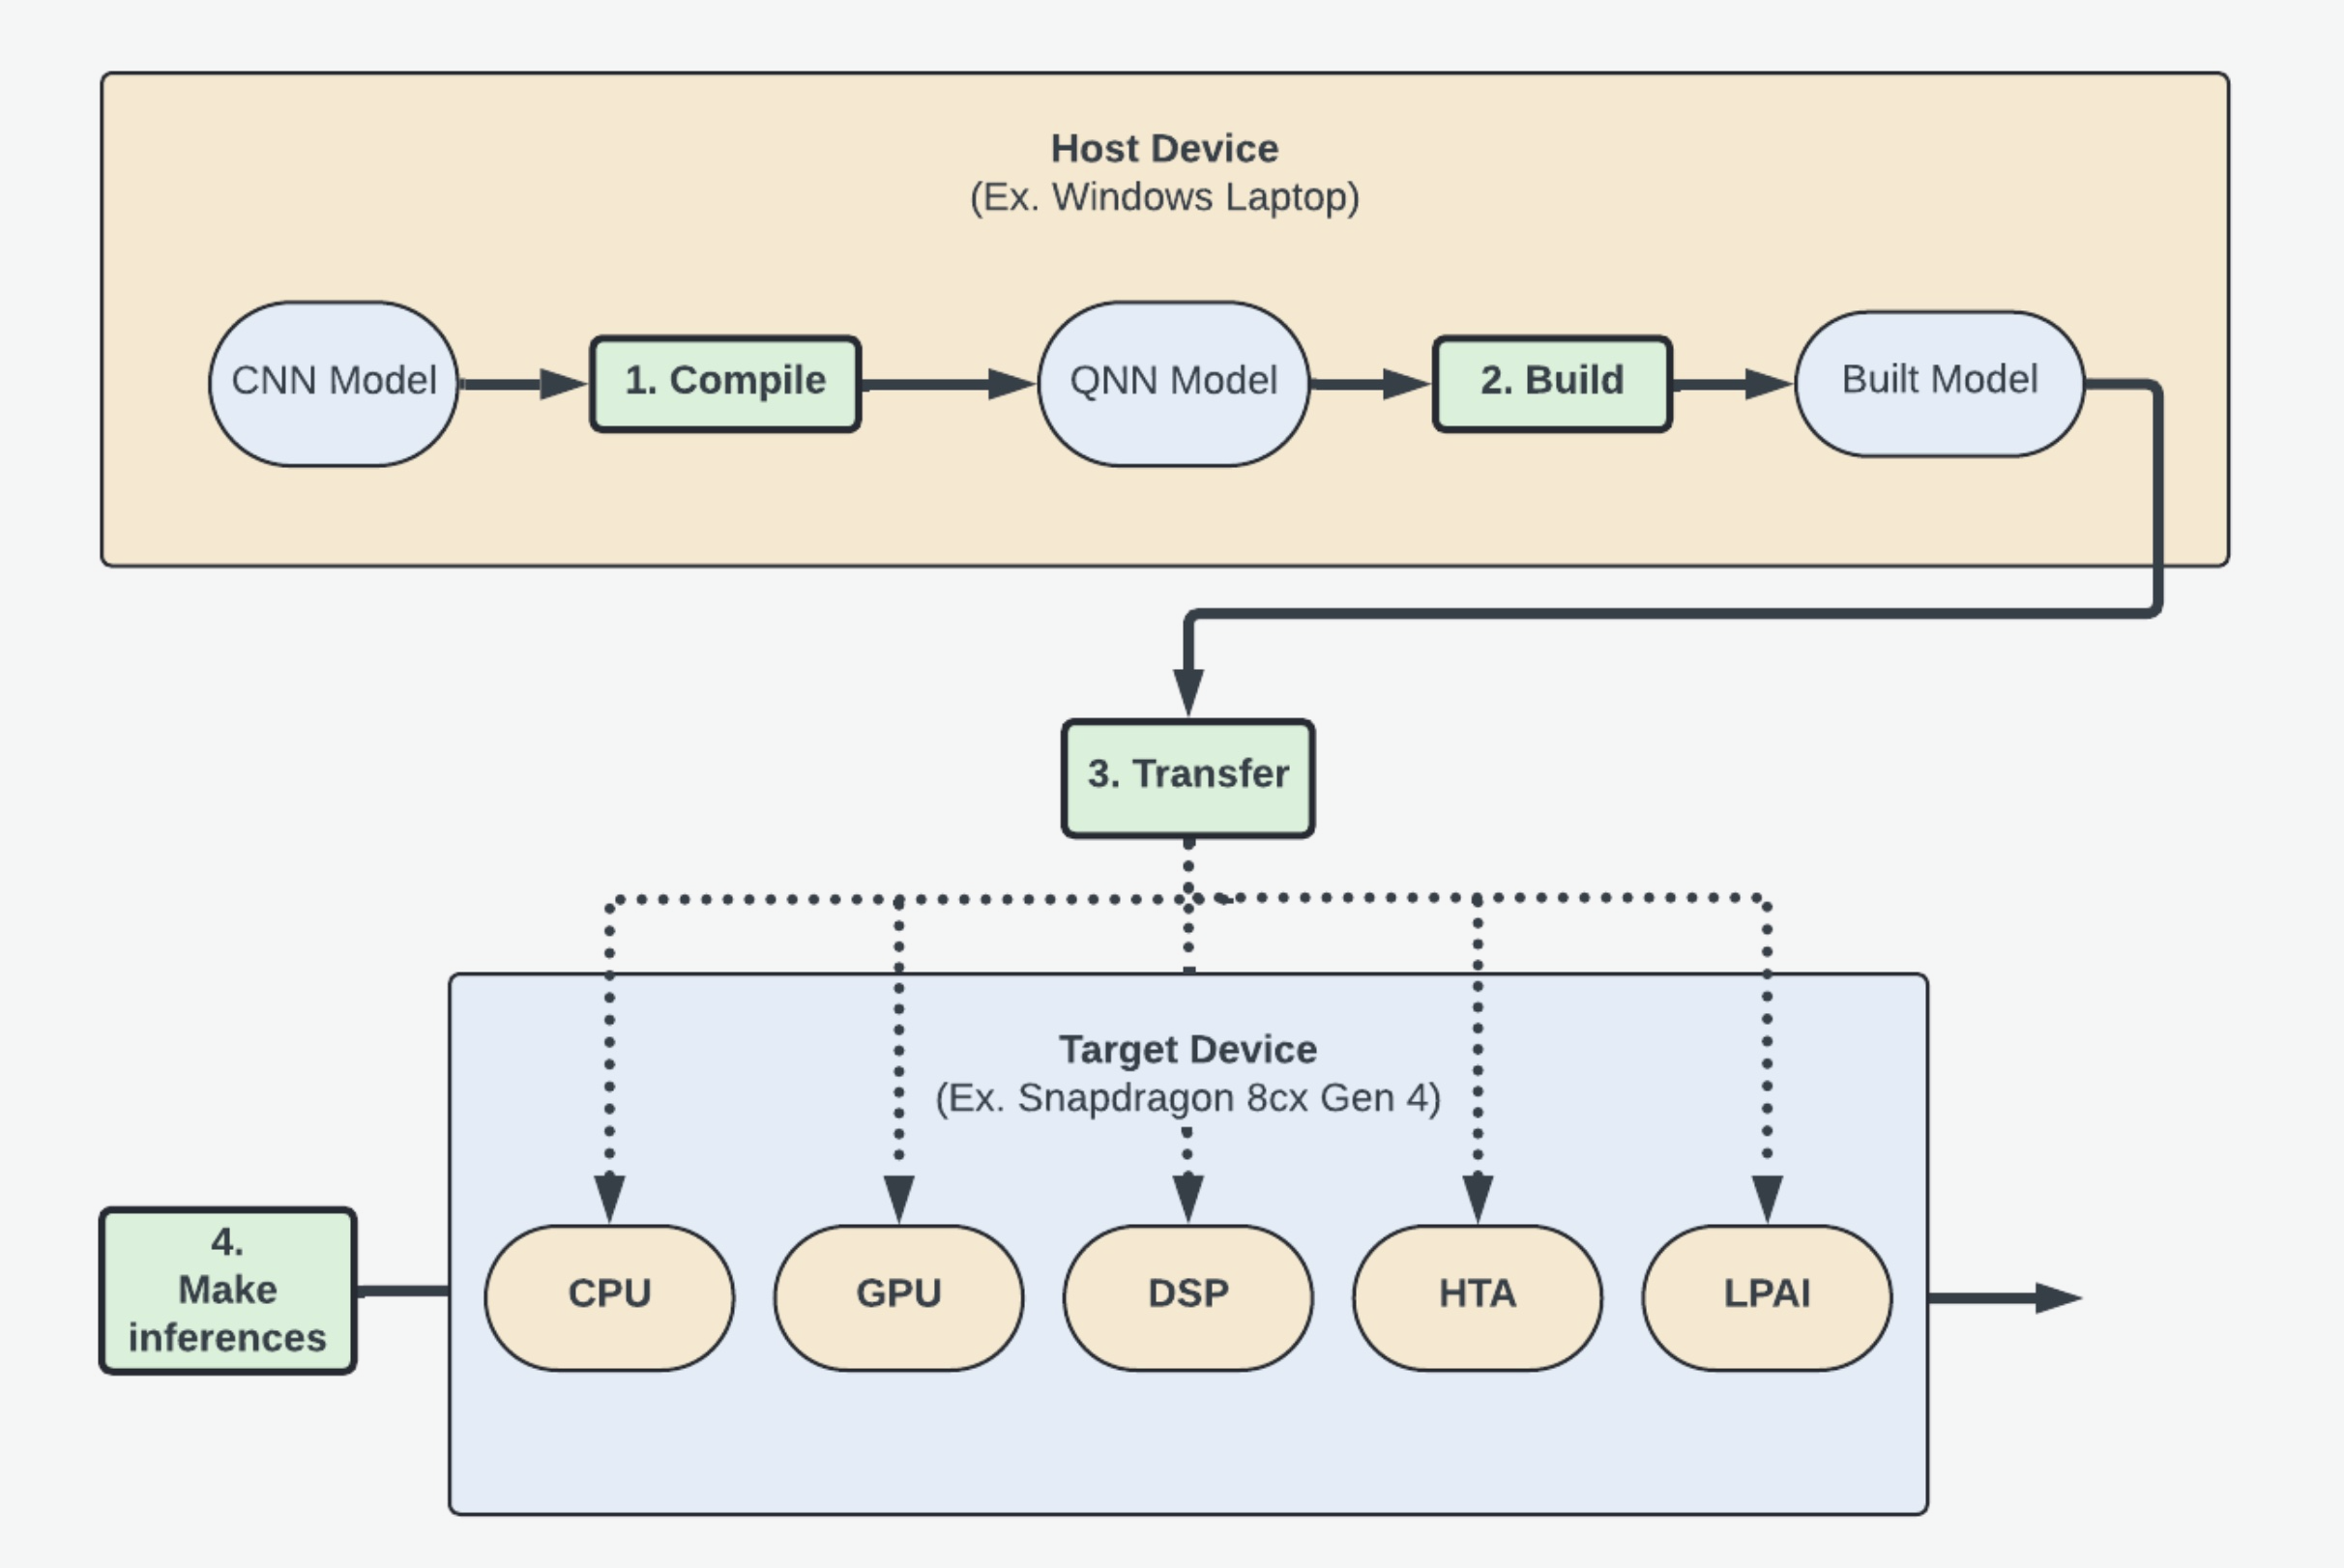
In order to do that, you will learn how to:
Convert your Open Neural Net eXchange (ONNX) model to a Qualcomm Neural Net (QNN) Model.
Build that model for a specific target device operating system. (Ex. Android)
Transfer and use the model to make inferences on the desired processing unit. (Ex. GPU)
Part 1: Tutorial Setup
Install the QNN SDK
Follow the instructions in Setup to install the QNN SDK. 1. Make sure to install the optional ONNX dependencies as this tutorial will use an ONNX model. (See Step 3 in Setup for more instructions).
Note
Using the same terminal for the Setup and these steps will speed up the process as some necessary setup steps only affect the terminal’s environment variables.
- Check that
QNN_SDK_ROOTis set to the folder just insideqairtby running$QNN_SDK_ROOT. You should see the path to the folder name inside
qairt(Ex..../qairt/2.22.6.240515)
If
QNN_SDK_ROOTis not set: 1. Navigate toqairt/<QNN_SDK_ROOT_LOCATION>/bin- Run
source ./envsetup.shto set the environment variable. Note: These changes will only apply to the current terminal instance.
- Run
- Check that
Ensure you are in the proper virtual environment for Python. 1. If you are not in a
venv, see Step 2 of Setup to install / activate your environment.
Set Up An Example ONNX Model
Step 1: Enter the models directory
cd ${QNN_SDK_ROOT}/examples/ModelsStep 2: Install numpy, onnx, aimet_onnx, onnxsim, and pandas.
pip3 install numpy onnx aimet_onnx onnxsim pandasStep 3: Obtain an ONNX Model
You can use whichever model you want, but as an example this guide uses EfficientNet Lite. You’ll likely want a packaged model (like
.tar.gzor.zip) to have access to both the model files and sample input data.
Step 3.1: Grab the download link for EfficientNet Lite
Navigate to EfficientNet Lite in your web browser.
Left-click
efficientnet-lite4-11.tar.gz.Right-click “Raw” in the top-right and click “Copy link address”.
Step 3.2: Download the model using wget.
wget https://github.com/onnx/models/raw/refs/heads/main/validated/vision/classification/efficientnet-lite4/model/efficientnet-lite4-11.tar.gzStep 3.3: Extract the model package.
tar -xf *.tar.gzStep 4: Save model path to an environment variable
In this step we want to save the model path to an environment variable for future use. This is the file that ends in
.onnx.export MODEL_PATH="${QNN_SDK_ROOT}/examples/Models/efficientnet-lite4/efficientnet-lite4.onnx"Step 5: Get model dimensions and name
Step 5.1: Retrieve model dimensions and name
Run this command to get the input name and dimensions
python3 -c "import os, onnx, onnxruntime; \
f = os.environ['MODEL_PATH']; \
m = onnx.load(f); \
s = onnxruntime.InferenceSession(f); \
lines = [f'ONNX Input: name={i.name}, shape={[d.dim_value for d in i.type.tensor_type.shape.dim]}\n' for i in m.graph.input]
print(''.join(lines), end=''); \
open('input_name_and_dim.txt', 'w').writelines(lines)"
You can access these values later by looking at
input_name_and_dim.txtStep 5.2: Save model dimensions and name to environment variables
eval $(sed -n 's/ONNX Input: name=\([^,]*\), shape=\[\(.*\)\]/export ONNX_INPUT_NAME="\1"; export ONNX_INPUT_DIMENSIONS="\2"/p' ${MODEL_PATH%/*}/input_name_and_dim.txt)Step 6: Create input_list.txt
For running the model and performing quantized conversions we need input data. The QNN tools expect this data to be in a raw format, and the paths defined in a text file.
Step 6.1: Convert inputs to raw
If your input data is in Protobuf format (
*.pb) it’s going to need to be converted.Note
This command assumes data in a path of
${MODEL_PATH%/*}/test_data_set_*/input_0.pb, edit it to suit your path if needed.python3 -c ' import onnx, numpy as np, struct, glob, os onnx_model_path = os.environ["MODEL_PATH"] base_dir = os.path.dirname(onnx_model_path) pattern = os.path.join(base_dir, "test_data_set_*/input_0.pb") for pb in glob.glob(pattern): tensor = onnx.TensorProto() with open(pb, "rb") as f: tensor.ParseFromString(f.read()) arr = onnx.numpy_helper.to_array(tensor).astype(np.float32) raw_path = os.path.splitext(pb)[0] + ".raw" arr.tofile(raw_path) print("Wrote", raw_path, arr.shape, arr.nbytes, "bytes") 'You should see the following output:
Wrote /home/qnn/qairt/2.36.0.250627/examples/Models/efficientnet-lite4/test_data_set_0/input_0.raw (1, 224, 224, 3) 602112 bytes
Wrote /home/qnn/qairt/2.36.0.250627/examples/Models/efficientnet-lite4/test_data_set_2/input_0.raw (1, 224, 224, 3) 602112 bytes
Wrote /home/qnn/qairt/2.36.0.250627/examples/Models/efficientnet-lite4/test_data_set_1/input_0.raw (1, 224, 224, 3) 602112 bytes
Step 6.2: Create a file containing every input path
ls -la "${MODEL_PATH%/*}" | grep '^d' | awk '{print $9}' | grep -vE '^\.\.?$' | awk -v dir="${MODEL_PATH%/*}" '{print dir "/" $0 "/input_0.raw"}' > "${MODEL_PATH%/*}/input_list.txt"Step 6.3: Save
input_list.txtto an environment variableexport QNN_INPUT_LIST="${MODEL_PATH%/*}/input_list.txt"
Part 2: Converting the ONNX model into a QNN model
Converting models into QNN format allows them to be built for specific target device operating systems and processors.
This tutorial is using an ONNX model, so we can convert by running the qnn-onnx-converter tool. If you are using another type of model, you can look at the Tools page for a table of potential scripts to help convert them into QNN format. They will have a similar qnn-model-type-converter naming convention.
You can use the QNN SDK to convert either full precision models or quantized models by following the below steps.
Warning
HTP and DSP target devices MUST use quantized models with the --input_list param.
Full Precision Model Conversion
Step 1: Convert the model
${QNN_SDK_ROOT}/bin/x86_64-linux-clang/qnn-onnx-converter \
  --input_network "${MODEL_PATH}" \
  -d "${ONNX_INPUT_NAME}" "${ONNX_INPUT_DIMENSIONS}" \
  -l "${ONNX_INPUT_NAME}" NHWC \
  --output_path "${MODEL_PATH%.*}_qnn_model.cpp"
Step 2: Save path to model for later use
Note
We don’t want to save the file extension as we’ll be using the variable to reference both the
.binand.cppfiles.export CONVERTED_MODEL_PATH="${MODEL_PATH%.*}_qnn_model"
Quantized Model Conversion
To use a quantized model instead of a floating point model, you will need to pass in the --input_list flag to specify the input.
Step 1: Run the quantized conversion
${QNN_SDK_ROOT}/bin/x86_64-linux-clang/qnn-onnx-converter \
  --input_network "${MODEL_PATH}" \
  --input_list "${MODEL_PATH%/*}/input_list.txt" \
  -d "${INPUT_NAME}" "${INPUT_DIMENSIONS}" \
  --weights_bitwidth 8 \
  --act_bitwidth 8 \
  --output_path "${MODEL_PATH%.*}_qnn_quantized_model.cpp" \
  --float_bitwidth 16
Step 2: Save path to model for later use
We don’t want to save the file extension as we’ll be using the variable to reference both the
.binand.cppfiles.export CONVERTED_MODEL_PATH="${MODEL_PATH%.*}_qnn_quantized_model"